However, there are times when I need to share my local changes with someone remotely and get feedback quickly. If the change is relatively minor, deploying to some staging environment might be overkill. How can I expose my local web server publicly so my clients can view my changes and provide immediate feedback?
Enter, ngrok!
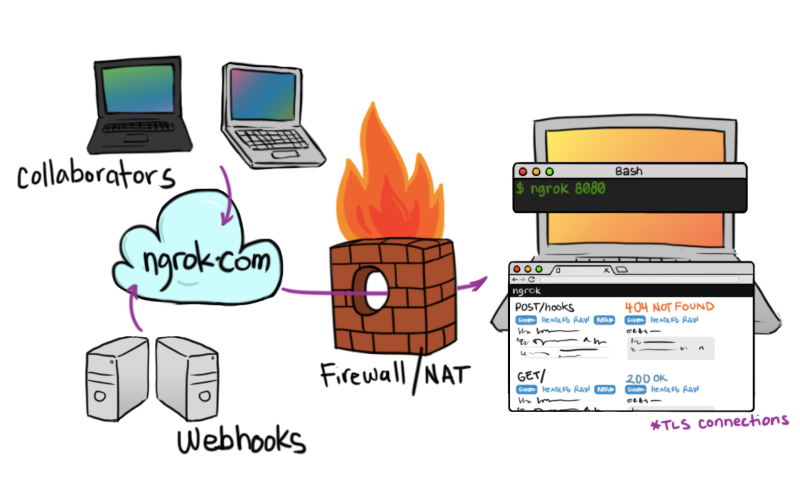
ngrok, creates a secure tunnel from a randomly-assigned, public internet address to a locally running web service. It also captures any traffic moving through the tunnel, allowing users to inspect HTTP request data. ngrok has several uses, and publicly exposing a local web server is one of them.
Installation

There really is no "installation" required. You simply visit the download page and follow the instructions. Since I'm an Ubuntu user, I downloaded the Linux .zip file, unzipped the binary, and began using it. Easy as pie!
Running a Web Server
Let's expose a local Rails web server! We'll assume a Rails project already exists and is ready to start. So, lets fire it up:$ rails server => Booting WEBrick => Rails 4.0.4 application starting in development on http://0.0.0.0:3000 => Run `rails server -h` for more startup options => Ctrl-C to shutdown serverNow, if we go to http://localhost:3000, we should see something resembling the following:

Sharing Our Local Web Server
To expose our local web server to anyone over the internet, we simply navigate to our ngrok binary and run the following:$ ./ngrok 3000The "3000" argument is the local port of our web server. If you are hosting something other than Rails, it may launch on a different port. In this case, simply replace "3000" with the port number of your web server.
Once ngrok is launched, it will display the following:
ngrok (Ctrl+C to quit)

Tunnel Status                 online
Version                       1.7/1.7
Forwarding                    http://2779ffc7.ngrok.com -> 127.0.0.1:3000
Forwarding                    https://2779ffc7.ngrok.com -> 127.0.0.1:3000
Web Interface                 127.0.0.1:4040
# Conn                        0
Avg Conn Time                 0.00ms
Using the information provided above, we have our public web address: http://2779ffc7.ngrok.com. We can share this URL with our collaborators! Any visits to this URL will be tunneled to our local web server. As people visit the URL, ngrok will update by displaying any HTTP requests flowing through the tunnel:
HTTP Requests
-------------

GET /favicon.ico              200 OK
GET /                         200 OK
Further Request Inspection with the Dashboard
ngrok provides a introspection dashboard which is hosted locally at http://localhost:4040/.
Since all HTTP traffic is captured by ngrok, more detailed information about each request can be explored on the dashboard. The dashboard updates in real-time. So, as people view your exposed website, the dashboard will update along with each request. You can explore request time, duration, headers, parameters, etc. It even pretty-prints JSON and XML responses to make them easier to read.
Conclusion
As more companies allow remote-working among their employees, collaborative tools utilizing the web will become more important. In the fast-paced world of web development, gathering feedback quickly is much easier because of tools like ngrok!Go on, give it a try! Let me know your thoughts by leaving a comment.
No comments:
Post a Comment